Yoga has been a popular activity for many years, with proven physical and clinical benefits. Chair Yoga is a newer program that is earning a rightful reputation as a unique variety of yoga in its own right. The world is in the middle of an obesity epidemic, caused by poor diet and inactivity. It is not always possible to participate in individual or team competitive sports, and gyms are not always conveniently located or affordable.
The Benefits of Using Chair Yoga
Chair yoga uses many of the same poses and stretches as conventional yoga but performed in, or with the assistance of a chair. It is extremely good for increasing flexibility, balance and coordination, as well as being a fantastic way to meet new people and form social bonds. It is incredibly relaxing, and can, therefore, combat issues such as insomnia, and does not exert any pressure on the knees unlike other forms of yoga, which can exacerbate issues such as tendonitis.
Why Chair Yoga is Preferred over Other Yoga Styles
Chair Yoga is not simply for the elderly. It is more convenient than other styles of yoga, as exercises can be performed at home with a chair rather than a mat, and the amount of space required is less than other forms. Furthermore, the stretches for beginners are incredibly easy to perform, meaning that it is an easier form of exercise to take up, and the strain on the lower body is lessened considerably with the support of a chair, allowing for a steadier build-up or strength and flexibility.
Who Should Use Chair Yoga
Part of yoga is focusing concentration and practicing controlled deep breathing. Both of these techniques have been proven to be effective in combatting both stress and pain. The stretches and poses that are performed are designed to improve flexibility and strengthen key muscles and joints, without being too physically strenuous.
Because of this, chair yoga is used to help people recover from one-off or recurring injuries, but is also a possibility for people suffering from disabilities which affect or restrict movement such as arthritis, as well as those with mobility issues. It is an especially popular activity for use with the elderly, as it keeps muscles and joints from seizing up, which is the most common sign of rapid physical decline in people over the age of 65.
Chair Yoga is also encouraged for those who are considered clinically obese, as a gateway to higher levels of physical activity. It is a beneficial starting point to reactivate muscles and joints and to increase the range of movement so that another physical exertion is more achievable.
Finally, it is used to provide exercise and concentration for people with mental health disorders, and the simplicity of watching and repeating movement has proven extremely effective in helping with communication difficulties.
The Quickest Way to Get Started With A Chair Yoga Program
The Internet is the place to go to get started with chair yoga. There are a great many introductory programs available for free, with paid courses being accessed after you have mastered the basic techniques, such as the ones listed in point five below. YouTube videos and diagrams are easy to find, and will help model new poses to avoid confusion and, when you are ready, there are a number of DVD programs available to follow from home, such as Anne Pringle Burnell’s ‘Stronger Seniors’ DVD.
10 Chair Yoga Poses
These ten poses are a good starting point, focusing on simple spinal and shoulder stretches to start increasing flexibility before progressing on to more complex maneuvers. The first poses are basic and the latter ones are a little harder.
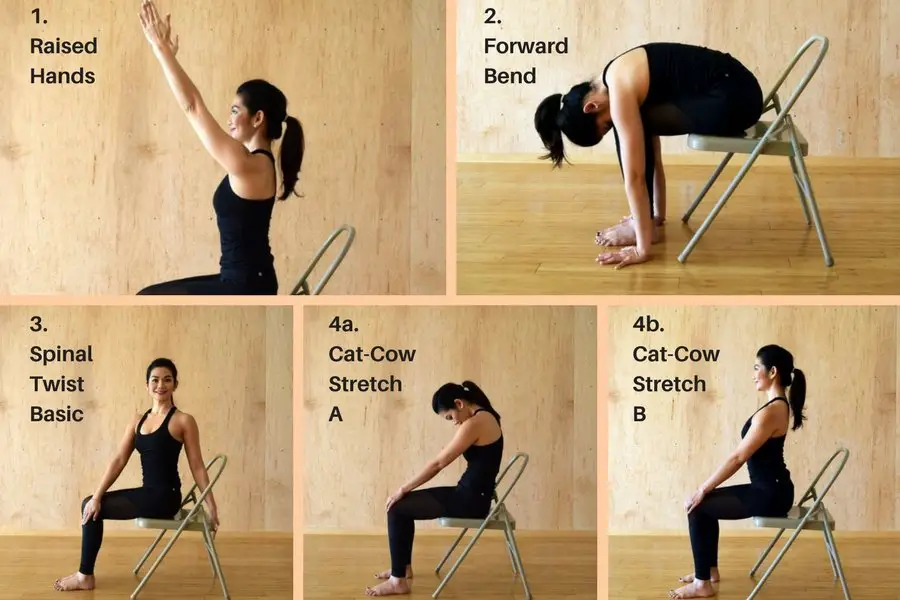
1. Chair Raised Hands
This is an ideal pose for chair yoga warm-ups, as it stretches the spine out in preparation for more difficult movements.
a. To perform this, reach your arms and fingertips up so that they are pointing directly at the ceiling. Inhale as you do so.
b. Meanwhile, drop your shoulder blades and ensure that your back is straight so that your upper and back muscles are activated.
2. Chair Forward Bend
This yoga pose focuses more on the lower back and core, so can be performed immediately before or after Chair Raised Hands.
a. Exhale and slowly bend yourself forward so that your head is as close to being in between your knees as possible.
b.Keep your hands loose and as close to the floor as you can.
c. As you inhale again, sit back up and raise your arms above your head. It is important to do this slowly to avoid a sudden rush of blood to the head, which can cause fainting.
3.Chair Spinal Twist Basic
To further support the spine, it is important to build up the muscles and flexibility either side of the spinal column.
a. For this, turn sideways on the chair and twist towards the chair back, holding it to assist with keeping the twist steady for a few seconds.
b. Do this as you exhale, and return to a forward-facing position on each inhale.
c.Remember to swap sides to achieve symmetry of movement.
4. Chair Cat-Cow Stretch
a. Another way to improve spinal mobility is to perform this double-movement stretch.
b. Place your hands on your knees while in an upright-seated position.
c. Inhale and arch your back slowly and shrug your shoulders up and down in a controlled motion.
d. Then, as you exhale, push your spine back and slowly put your chin towards your chest, so that your head and shoulders are both pushed forward.
e. Return to the neutral position and repeat.
Safety and feasibility of modified chair-yoga on functional outcome among elderly at risk for falls
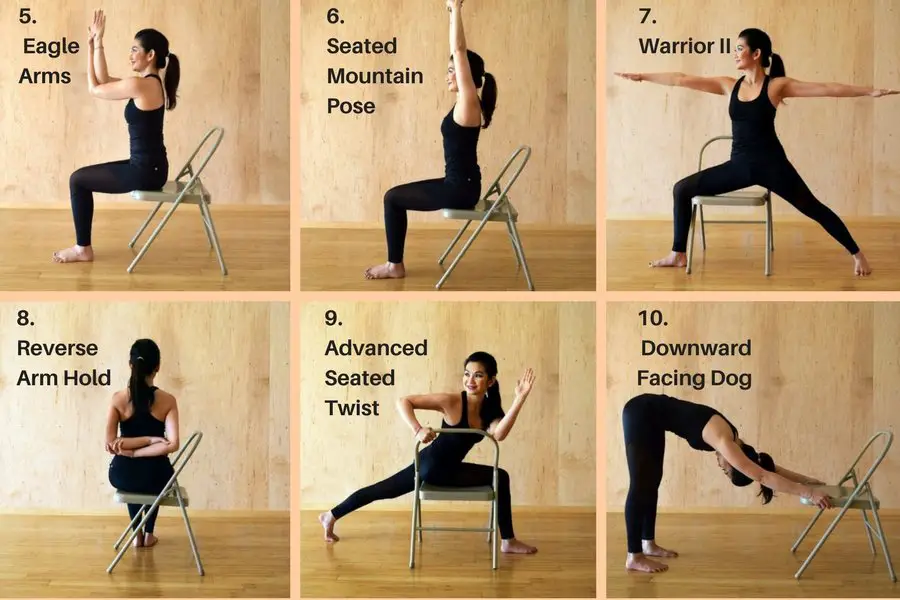
5. Eagle Arms
a. Stretch your arms and shoulders out with this simple pose.
b. Inhale and exhale twice. Bring your arms forward, place one under the other, and then try to hold hands with yourself as if tied in a knot, on your breath out.
c. In this position, inhale again as you lift your elbows up to stretch the arms and chest.
d. Then lower your elbows and push your shoulders forward on the next breath out, before returning to a normal position and repeating.
6. Seated Mountain Pose
This is one of the best core chair exercises. Maintain good posture and focus on breathing. Finish every yoga pose in this position
a. Breath deeply, extending your back and sit straight in your chair.
b. When exhaling try to mash your tailbone deep into the chair or the center of your weight when sitting.
c. Maintain a 90-degree position with your legs and keep them in line with your ankles. Leave some distance between your legs and
d. Breathe deeply and while exhaling roll your shoulders from top to bottom down your back. Pull in your abdomen and relax your arms on the sides of your body.
e. Lift your toes while planting all of the soles of your feet firmly into the floor.
7. Warrior II (Virabhadrasana I)
a. Start in the Seated Mountain position and breathe deeply. While inhaling raise your arms out to the side 90 degrees then slowly raise them until they meet above your head.
b. Interlace your fingers, keep your fingers straight out and pointed above your head toward the ceiling directly above your head.
c. Exhale slowly while rolling your shoulders. Let your shoulder blades relax down your body. This will exercise the shoulder capsule.
d. Take at least 5 breaths before releasing your hands then let your arms return to their original position.
e. Take 5 breaths while in the Mountain Position before releasing the hands
8. Reverse Arm Hold
This will stretch your shoulders while opening the chest. This will help with stress relief, breathing and posture. Rember to always keep the back straight during this pose.
a. Stretch your arms out at 90 degrees palms down while inhaling.
b. While exhaling roll the shoulder, this will roll the palms up so they are facing back. Bend your elbows and let your hands swing freely behind your back.
c. Join your hands together and try to pull your hands apart without releasing your hold. If you can, hold on to your elbows.
d. After 5 breaths release.
9. Advanced Seated Twist (Parivrtta Sukhasana)
These poses done while twisting your lower back will help circulation and digestion. They are sometimes called a detox pose.
The chair is meant to help you with the twist but you do want to use it to pull yourself. Use it only as a means of stability.
Everyone’s body has a natural point to stop. Do not try to press past this point or you may injure yourself.
a. Breath deeply and extend your back upward. Raise your arms 90 degrees from your body then slowly raise them straight up.
b. When you exhale twist to the right and lower your arms to your chair. Your right hand should be on the back of your chair and the left placed on the seat of the chair. Use the right hand to stabilize while twisting.
c. Turn your head to look over your right shoulder. Stay in your twist for 5 deep breaths the return facing the front of your chair.
d. Repeat the move on the left.
10. Downward Facing Dog (Adho Mukha Svanasana)
a. Stand in front of your chair. Slowly fold forward at the hips, and hold the sides of your chair with both hands.
b. Slowly move back until your arms are straight and your spine is long. Head resting at the height of your arms.
c. Keep your feet hips distance apart. See that your hips are stacked over your knees. If your hamstrings are tight, bend your knees.
d. Inhale, firm your upper outer arms in, and lengthen up from the fingertips to the shoulders and the hips.
e. Exhale, draw your shoulder blades down, away from the ears. Press your thighbones back.
f. Stay here for 5 breaths.
The real positive about chair yoga is that it is extremely easy to get started, and the above poses can be performed by almost anybody without practice.
However, repetition will increase the overall sphere of movement, allowing for more complicated exercises to be attempted. Before too long, most people are able to perform over 20 different yoga poses, and have increased their mobility, flexibility, and control exponentially.
Open Monitoring Meditation Sequence
People who are under a great deal of stress usually feel like they were run over by a truck. Open monitoring can let you stand on the side of the road and let the truck roll casually by instead.
Try this 5-minute meditation sequence after you have finished the exercises in our workout above.
Sit comfortably in your chair. Close your eyes and try to let your mind concentrate on only your body’s breathing. Follow your body as it inhales and exhales. Breath in through the mouth and exhale through your nose. This can let you become more aware of body issues, stress, muscle tension and more. Let yourself move away from these issues and into a happier environment. It teaches you to let these issues seemingly float away and not have as large an impact on your day to day life.
Do this as a way to unwind and move to a better spot before returning to day to day life.
You Might Also Be Interested In A Few Similar Posts