We have set up a 10 Minute Plank Buster Workout Challenge for you to try. The premise of exercise is that all good things start in the core. Planks rule your core and will give you results you will love. Planks give you strong and defined abs. You just have to learn how to perform the exercises correctly. Planks have been around for years. This isn’t just a trendy exercise that will die out once people find new fun ways to get in shape. The results it yields are so overwhelming it will probably be the central exercise in your program.
How Does a Plank Work?
The plank is defined as a stability exercise that allows you to have tension in your muscle without any movement or intentional pressure basically isometric exercise the center on the entire body. While you are in planking position, your midsection naturally gravitates towards the ground. By resisting that and keeping your back aligned, you are strengthening your abdomen and keeping it engaged. It is what gives your abs that definition and strength. For most people, it is pretty difficult to keep still in this pose probably because of the balance and strain that comes with it. This is also because they are used to being able to move a lot during workouts. However, this isn’t true. This held position is known as an isometric exercise. These exercises provide just as much burn and intensity as a regular workout does. Planks are a very popular exercise that millions of people all over the world are using daily in their fitness routines.
What Muscles Are Manipulated During Plank?
This exercise is best for strengthening and tightening the muscles located in your abdomen. Some of these include the transverse abdominals and the obliques. It pretty much provides strength and stability to your entire upper body.
Benefits of Plank
Flatter, Defined Core
I know that most of the people reading this article want a better-looking core that is both defined and flat. Though this may be true, that’s not what exercise is all about. A stomach that is flatter is also less in size, meaning that there isn’t as much weight pulling on your skin and putting a strain on your back. It also means that your posture will be much better and buttoning jeans won’t be as hard.
Less Strain on Your Back
Back pain can be diminished by the constant practice of a proper plank. This is because the strength used in the core while holding position helps straighten your spine. The American Exercise Council has also noted that the plank is a pretty great exercise to do if you’re someone that suffers from chronic back pain.

Better Balance, Better Posture
Having a good, strong core will definitely contribute to you having a beautiful posture. Practicing the plank exercise will make you look less slouched and hunched over. It will make you look taller and healthier. Your core is also the key to having good balance. When you make the effort to strengthen your core, it improves your balance. Balance is going to be more important as we age because it will be a bit harder to move things around and lift.
From the pages of Dr. Axe: Plank Variations
A helpful article by Healthline: Working the Core
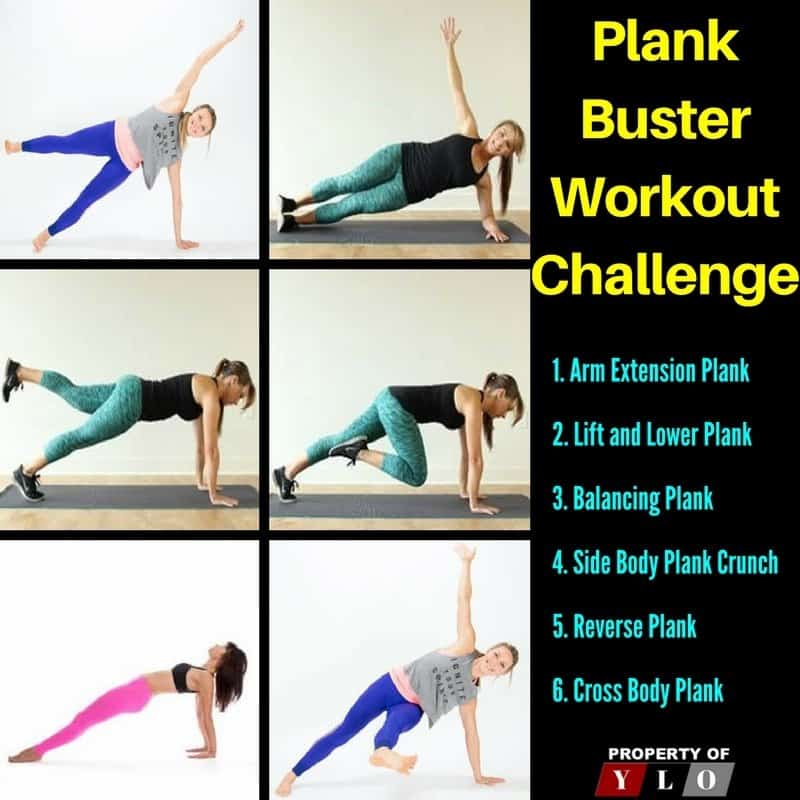
The 10 Minute Plank Buster Challenge
Hopefully, you have a good understanding of the basic plank. If you want to move on to the next level, you’re right on track! This particular plank is going to be lasered onto the most prominent muscles in the back and core. It will also help with your balance and definition in muscle. The intensity is what makes it a challenge. Make sure that your form is down and you’re keeping yourself balanced. If not, you won’t get the results that you are hoping for.
Do each exercise for 45 seconds. This will not be something you can do from day 1 but something that will build over time. Your goal is to be able to hold each position for 45 seconds, rest 30 seconds and continue to the next exercise. Perform this entire thing twice to get a nice workout. This core strengthening workout is great to do at the end of any workout or at any time when you have spare time to complete it. It’s simple enough that you can do it pretty much anywhere.
1. Arm Extension Plank
Start with getting in the plank pose. Make sure that your wrists are in line with your shoulders. Keep your body extended and your feet touching.
Raise one arm and hold it for a second. Raise the other arm and do the same.
Do this for about 30 seconds.
2. Lift and Lower Plank
Lie on one side of your body and prop yourself up with your forearm. Keep your body extended. Keep your elbow and your forearm aligned with your body and lift your hip upward to put yourself in the plank position. Put your feet on top of one another and keep your body in a straight line.
Lower your body, mainly your hips, down towards your mat. Use your core and arms to stay balanced and keep yourself tight. Don’t wobble back and forward, stay upright.
Keep this going for 45 seconds. Repeat on the other side for another 30 seconds when done.
3. The Balancing Plank
Once again, you need to start in the plank pose and keep your wrists aligned with your shoulders. Bending too far forward or backward in not correct form and can cause tension in the wrists.
Raise your right arm and your left leg at one. Extend them both and hold it for a one second. Lower both your hand and your foot on the ground and repeat this move on the opposite side.
Do this for 45 seconds.
4. Side Body Plank Crunch
In the same exercise, you need to start in the plank pose and keep your wrists aligned with your shoulders. Bending too far forward or backward in not correct form and can cause tension in the wrists. Keep your core engaged and lift your hips up to perform this pose. Raise your arm up towards the sky. Remember to stay balanced.
Raise your elbow up to your top arm and your knee onto your leg to bring to your elbow so they touch. Extend them both out and repeat this move. It will really get your obliques going along with your core when you perform this exercise.
Do this for 45 seconds on each side of your body.
5. Reverse Plank
Start by sitting on the floor and extending your legs out long and straight in front of you. Put your hands on your hip point and spread them just an inch out farther than your shoulder point. Make sure that your fingers are pointing towards your feet.
Lift yourself off of the floor but only lift your hips and your torso. Look up towards the ceiling while you keep your neck and shoulders at ease. Keep your body straight and do not put tension on your feet. Keep them soft and relaxed. Make sure your core is tight and your posture is alert and straight, not slouchy or saggy.
Hold this pose for 45 seconds and drop to the floor slowly.
6. Cross Body Plank
Start in a plank position with your arms and shoulder in line with each other. Keep your feet together and keep your body in a straight, extended line.
Lift one leg off of the floor and towards and over your chest. Try and make it so that your knee and elbow are almost touching. Try and get them as close to each other as you can. Let this position go, go back to standard plank position, and repeat the same thing with the other leg.
Rest for 45 seconds.
Rest for several seconds and repeat the exercise or keep it going for at least 10 minutes.
Hopefully, by now you’re excited and ready to get started!
Let us know if you have tried any other plank poses and how it is working for you. Our readers all are looking for information on how to improve their core fitness.
Click On The Images To View A Few Similar Posts