Vinyasa Flow Sequence for Arm Strength. Yoga is more widely known for stretching, flexibility, and meditation. It also gives you that venue to strengthen and shape your body. Many of the poses require you to push up from the floor and lift your body, a sure fire way to build stronger arms. In most cases, there is no single sequence that you must follow, so there is a lot of room for individual personalities.
Vinyasa Flow for Arm Strength – An Alternative to Weights
Are you tired of doing dumbbell exercises to tone and shape your arms? There is a better answer and that is “Yoga.” Yoga provides you with so many benefits that weights and conventional exercises cannot. Weights will provide muscle mass and you can also bulk up. Not what a lot of ladies are looking for, they want to tone not add bulky muscle.
Many people choose the weights, and barbells first which are counterproductive to body shaping. There are other methods in the gym which can be used as well as yoga such as the TRX. The point is that even that is using resistance to your body weight and all you need to do that is a yoga mat. This bodyweight training will give you more of what you want and less of what you are trying to avoid.
There are a number of forms of Yoga and each has its benefits and things it lacks. The American version of “Power Yoga” can give you the muscle definition you are looking for. Today our options will be Vinyasa Flow Yoga.
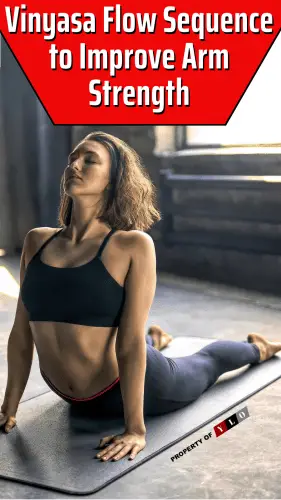
1. Plank
1. Start in Adho Mukha Svanasana. Then inhale and draw your torso forward until the arms are perpendicular to the floor and the shoulders directly over the wrists, torso parallel to the floor.
2. Press your outer arms inward and firm the bases of your index fingers into the floor. Firm your shoulder blades against your back then spread them away from the spine. Also spread your collarbones away from the sternum.
3. Press your front thighs up toward the ceiling, but resist your tailbone toward the floor as you lengthen it toward the heels. Lift the base of the skull away from the back of the neck and look straight down at the floor, keeping the throat and eyes soft.
2. Chaturanga
1. From Plank Pose, align your shoulders slightly ahead of the wrists and come onto the balls of your feet, pressing the soles of your feet back, as if into a wall behind you.
2. Simultaneously push back through the heels to engage the quadriceps and bring the lower body to life, and reach your sternum forward, creating a straight, taut line of energy from the crown of your head through your feet.
3. On an inhalation, draw the heads of the shoulders and the tops of the thighs up and away from the floor, pull your lower body up and in, and release the tailbone toward the floor.
4. On an exhalation, bend your elbows, keeping them over your wrists and drawn in against your sides. Slowly lower yourself toward the floor, keeping your body as straight as a plank of wood, neither letting your center sag nor sticking your buttocks up in the air.
5. Bring your gaze to the floor, about 6 inches in front of you, and continue to lower until your shoulders are at the same height as your elbows.
6. Continue to reach through the heels, sternum, and crown of the head as you breathe.
7. To come out of the pose, exhale and lower down to your belly or push back up to Plank Pose.
3. Up Dog
1. Lie prone on the floor. Stretch your legs back, with the tops of your feet on the floor. Bend your elbows and spread your palms on the floor beside your waist so that your forearms are relatively perpendicular to the floor.
2. Inhale and press your inner hands firmly into the floor and slightly back, as if you were trying to push yourself forward along the floor. Then straighten your arms and simultaneously lift your torso up and your legs a few inches off the floor on an inhalation. Keep the thighs firm and slightly turned inward, the arms firm and turned out so the elbow creases face forward.
3. Press the tailbone toward the pubis and lift the pubis toward the navel. Narrow the hip points. Firm but don’t harden the buttocks.
4. Firm the shoulder blades against the back and puff the side ribs forward. Lift through the top of the sternum but avoid pushing the front ribs forward, which only hardens the lower back. Look straight ahead or tip the head back slightly, but take care not to compress the back of the neck and harden the throat.
4. Downward-Facing Dog
1. Come onto the floor on your hands and knees. Set your knees directly below your hips and your hands slightly forward of your shoulders. Spread your palms, index fingers parallel or slightly turned out, and turn your toes under.
2. Exhale and lift your knees away from the floor. At first, keep the knees slightly bent and the heels lifted away from the floor. Lengthen your tailbone away from the back of your pelvis and press it lightly toward the pubis. Against this resistance, lift the sitting bones toward the ceiling, and from your inner ankles draw the inner legs up into the groins.
3. Then with an exhalation, push your top thighs back and stretch your heels onto or down toward the floor. Straighten your knees but be sure not to lock them. Firm the outer thighs and roll the upper thighs inward slightly. Narrow the front of the pelvis.
4. Firm the outer arms and press the bases of the index fingers actively into the floor. From these two points lift along your inner arms from the wrists to the tops of the shoulders. Firm your shoulder blades against your back, then widen them and draw them toward the tailbone. Keep the head between the upper arms; don’t let it hang.
After 6 to 8 times through the vinyasa flow, move right into these poses, which you will hold for 30 seconds or more to build strength. Remember: 30 seconds is a suggestion. Change the time according to your own strength. Give everything a second try if time allows!
When you have become comfortable with the 4 pose workflow begin adding in these more advanced poses. These are much easier if you have a spotter or helper as you start to work into them. Try to add 1 or two a week to the first 4 poses until you have mastered the entire 10 pose sequence.
5. Yoga Side-Plank
1. Begin in Downward-Facing Dog. Lower your hips and shift your weight forward to come into Plank Pose: Palms flat, body extended, with your legs reaching through your heels.
2. Step your feet together and press your weight down through your right hand and forearm. Then, roll your body to the right, balancing on the outer edge of your right foot. Stack your left foot on top of your right foot and keep your legs straight.
— Beginners can lower their right knee and shin to the mat, keeping their hips lifted while building strength in the arms and torso.
3. Extend your left arm to the sky, reaching through your fingertips as you lift your hips and firm the triceps of both arms. Feel the muscles across your shoulder blades flex. Firm your thighs, and press through your heels into the floor.
4. Bring your body into one straight line. Gaze at your top thumb. Press down through your bottom index finger.
Hold for up to 30 seconds. Exhale as you slowly return to Plank Pose,
6. Crow Pose
Newer students might feel more comfortable doing the pose with a pile of blankets or a pillow in front of them in case they fall forward. Be sure to set up your “falling spot” before you come into the pose!
1. Begin by standing at the top of your mat in Mountain Pose (Tadasana) with your arms at your sides. Step your feet about as wide as your mat.
2. Bend your knees and lower your hips, coming into a squat. Separate your thighs so they are slightly wider than your torso, but keep your feet as close together as possible. If your heels lift, support them with a folded mat or blanket.
3. Drop your torso slightly forward and bring your upper arms to the inside of your knees. Press your elbows along the inside of your knees and bring your palms together in prayer position. This is Garland Pose (Malasana).
4. Bring your palms to the mat, keeping them about shoulder-distance apart. Spread your fingers and press evenly across both palms and through your knuckles.
5. Press your shins against the back of your upper arms. Draw your knees in as close to your underarms as possible.
6. Lift onto the balls of your feet as you lean forward. Round your back and draw your abdominal muscles in firmly. Keep your tailbone tucked in toward your heels.
7. Look at the floor between your hands or at a point even more forward, if possible.
8. As you continue to lean forward, lift your feet off the floor and draw your heels toward your buttocks. If it’s difficult to lift both feet at the same time, try lifting one foot and then the other. Balance your torso and legs on the back of your upper arms.
9. Keep pressing evenly across your palms and fingers, then begin to straighten your elbows. Keep your knees and shins hugging in tightly toward your armpits. Keep your forearms drawn firmly toward the midline of your body.
10. Touch your big toes together. Draw your belly in. Breathe steadily.
Hold the pose for up to one minute. To release, exhale as you slowly lower your feet to the floor.
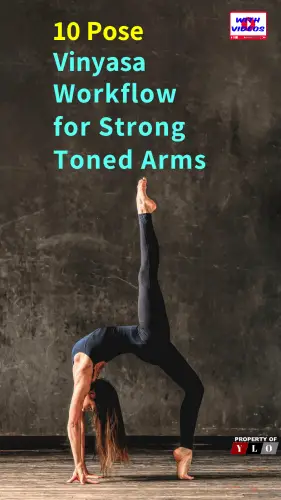
7. Wheel Pose
1. Start lying on your back and bend the knees bringing heels in towards the hips to where the fingertips can barely graze the heels. The feet should be hip distance apart.
2. Ground the soles of the feet and place the palms down on either side of the head (shoulder width distance). The fingers should be pointing towards the shoulders with thumbs closest to the ears. Begin to lift the hips up by pressing firmly and evenly through arms and legs.
3. In the arched position, keep extending the hips, elongate the arms, and draw the ribs upwards. To keep the knees from splaying and straining the lower back, rotate the thighs inwards.
Hold for as long as you can bear it, but remember to breathe!
When coming out of the pose, remember to tuck the chin into the chest before bending the elbows and rolling down one vertebra at a time.
8. Dolphin Pose
1. Begin on your hands and knees. Align your wrists directly under your shoulders, and your knees directly under your hips. The fold of your wrists should be parallel to the top edge of your mat, and your middle fingers should point directly forward.
2. Lower your elbows to the floor directly beneath your shoulders. Keep your forearms parallel to each other and to the side edges of your mat. Distribute your weight evenly across both forearms.
3. Tuck your toes and lift your knees off the floor. Reach your pelvis up toward the ceiling, then draw your sit bones toward the wall behind you. Keep your knees bent as you lengthen your spine and broaden across your shoulder blades.
4. Then, gently begin to straighten your legs. Bring your torso and legs into the shape of an “A.” Do not walk your feet closer to your hands — keep the extension of your whole body. If your upper back begins to round, bend your knees again until your spine is straight.
5. Draw your shoulder blades into your upper back ribs and toward your tailbone. Widen across your collarbones.
6. Align your ears with your upper arms. Relax your head, but do not let it dangle. Gaze between your legs or toward your navel.
Hold for 5-25 breaths. To release, exhale as you gently bend your knees and come back to the floor.
9. Reverse Tabletop Pose
1. Begin by sitting on the floor with your legs extended in front of you and your arms resting at your sides in Seated Staff Pose (Dandasana).
2. Bend your knees and place your feet flat on the floor.
3. Place your hands several inches behind your hips, shoulder-width apart. Press your palms flat, and turn your fingertips inward so they point in the same direction you are facing (toward your toes).
4. Inhaling, press firmly into your hands and feet. Straighten your elbows, and lift your hips up toward the ceiling. Draw your shoulder blades firmly into your back and lift your chest. Try to bring your chest, torso, and knees into one straight line, parallel to the floor.
5. Keep your legs active and firm, but do not squeeze your buttocks. Press down through all ten toes.
6. If you are comfortable here, then gently drop your head back so that the crown of your head faces the floor. Gaze gently at the wall behind you. Breathe softly.
Hold for 5-10 breaths. To release, slowly lower your hips to the mat. Extend your legs
10. Side Crow
1. Bend your knees to a half-squat, thighs parallel to the floor. If your heels don’t rest comfortably on the floor, support them on a thickly folded blanket. Take your left elbow to the outside of your right thigh as you soften your belly.
2. Exhaling, twist your torso to the right, bringing your left lower ribs across toward your right thigh as far as you can.
3. Slide the back of your left arm down the outside of the right thigh, bringing your outer armpit as close to the outer thigh as you can. Keeping the arm in place, do a slight back bend and draw your right shoulder back to twist your torso more deeply.
4. Exhaling each time, repeat these alternating back bending and twisting movements until you reach your maximum rotation. Then slide your left upper arm several inches toward your right hip and press it firmly against your right thigh; maintaining this pressure, draw the upper arm back toward your right knee without allowing the skin to slide. This will rotate the flesh of the upper arm outward, locking it in place. Once your arm is in position on your thigh, not the point of skin-to-skin contact. Try not to change it throughout the pose.
5. Now squat down fully, buttocks just above your heels. Place your left palm on the floor just outside your right foot. If the hand doesn’t easily reach the floor, tip your torso to the right until you can put your palm down flat. Maintaining contact between your left upper arm and your right outer thigh, lean even more to the right until you can place your right hand on the floor. Your hands should be shoulder width apart and positioned on an imaginary line drawn diagonally away from your right foot angled in the direction of the heel. Set your fingers parallel to each other. Most of your weight will still be on your feet.
6. Concentrate on maintaining the point of contact between your left arm and right thigh as you slowly lift your pelvis and shift it to the right, aiming to bring the middle of your abdomen above and between your hands. This is not the precise balance point, but if you get this close you’ll probably be able to find the perfect position by feel. As you get close, the weight on your hands will increase, while that on your feet will decrease until they lift easily.
7. Now put the finishing touches on the pose. Keep your feet together and press out through their inner edges. Draw your heels toward your buttocks. Exhaling, soften your belly to prepare for the twist, then pull your left hip strongly down and lift both feet up. Your left arm may remain slightly bent but straighten it as much as you can without allowing your legs to slide down.
8. Straighten your right arm completely. As you lift your right shoulder, twist your spine further. Lift your chest and head, and look forward. Breathe evenly and naturally.
Hold the pose for 20 seconds or longer, then lower your feet back to the floor with an exhale. Repeat it on the other side for the same length of time.
Now that you have been able to introduce all of the 10 poses into your workflow you will either be able to add more times going through the flow and/or longer times you hold each pose before moving to the following poses. You may also change the order of the poses to something that you are more comfortable with.
A helpful article by WebMD: The Health Benefits of Yoga
You Might Also Like These Similar Posts